0x01 TL;DR 该漏洞是近期被大众熟知的经典溢出漏洞,影响范围还是比较广的。其实该漏洞早在2020年8月就被syzbot 发现了,但是并没有人去讨论。该漏洞只有几个字节的溢出,而且固定溢出字节是\x00,那么对于要写利用来说,难度是成倍的提升了。不管是漏洞成因和漏洞利用来说,该漏洞是很值得一看的。
0x02 Debug Environment 这里环境搭建我采取的是自己编译了一版Ubuntu的内核,并用了syzkaller中debootstrap制作系统文件镜像的脚本,最后利用QEMU模拟硬件启动内核。
QEMU:6.1.0
Kernel:5.8.1
Filesystem: debootstrap
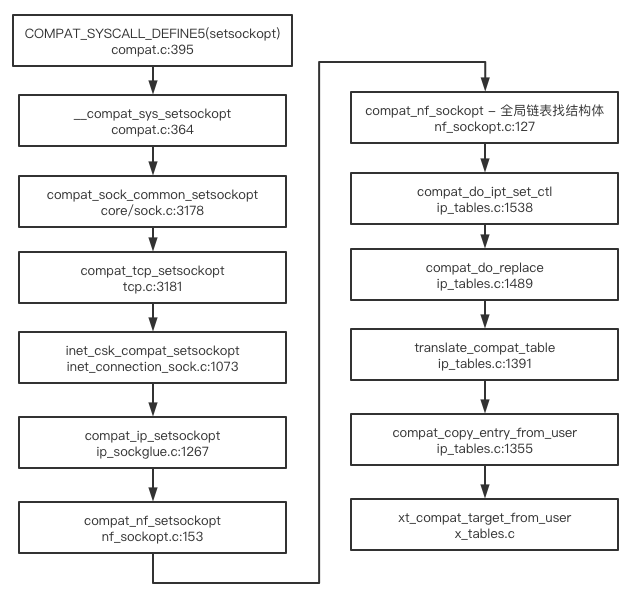
0x03 Root Case 漏洞代码在net/netfilter/x_tables.c:xt_compat_target_from_user:
1
2
3
4
5
6
7
8
9
10
11
12
13
14
15
void xt_compat_target_from_user (struct xt_entry_target *t, void **dstptr, unsigned int *size) const struct xt_target *target = t ->u .kernel .target ; struct compat_xt_entry_target *ct = (struct compat_xt_entry_target *)t ; t = *dstptr; memcpy (t, ct, sizeof (*ct)); pad = XT_ALIGN(target->targetsize) - target->targetsize; if (pad > 0 ) memset (t->data + target->targetsize, 0 , pad); }
但是光从这一块代码是看不出什么的,也并不能看出这里的memset会导致溢出,因此我们需要从代码根源出发。
往前找该函数的交叉引用,再结合socket内核源码的一些审计,可以得到这样一条链(为了防止变成源码分析的文章就不过多叙述这一块了):
理清楚代码执行流程之后,就该思考如何构造POC才能到达目标漏洞点了,其中,理解代码的含义也很重要。
这部分我就专挑编写POC需要注意的一些点来说,首先看compat_do_ipt_set_ctl这块函数:
1
2
3
4
5
6
7
8
9
10
11
12
13
14
15
16
17
18
static int compat_nf_sockopt (struct sock *sk, u_int8_t pf, int val, char __user *opt, int *len, int get) struct nf_sockopt_ops *ops ; int ret; ops = nf_sockopt_find(sk, pf, val, get); if (get) { } else { if (ops->compat_set) ret = ops->compat_set(sk, val, opt, *len); } module_put(ops->owner); return ret; }
上面代码中的全局链表nf_sockopts在net/ipv4/netfilter/ip_tables.c文件中会被引用到:
1
2
3
4
5
6
7
8
9
10
11
12
13
14
15
16
17
18
19
20
21
22
23
24
25
26
27
28
29
30
31
32
33
34
35
36
37
38
39
40
41
42
43
44
45
46
47
48
49
50
51
52
53
54
55
56
57
58
59
60
61
62
63
64
65
66
67
68
static struct nf_sockopt_ops ipt_sockopts = { .pf = PF_INET, #ifdef CONFIG_COMPAT .compat_set = compat_do_ipt_set_ctl, #endif .owner = THIS_MODULE, }; static struct xt_match ipt_builtin_mt [] __read_mostly = { { .name = "icmp" , .matchsize = sizeof (struct ipt_icmp), .proto = IPPROTO_ICMP, .family = NFPROTO_IPV4, .me = THIS_MODULE, }, }; static struct xt_target ipt_builtin_tg [] __read_mostly = { { .name = XT_STANDARD_TARGET, .targetsize = sizeof (int ), .family = NFPROTO_IPV4, .compatsize = sizeof (compat_int_t ), }, { .name = XT_ERROR_TARGET, .target = ipt_error, .targetsize = XT_FUNCTION_MAXNAMELEN, .family = NFPROTO_IPV4, }, }; static int __init ip_tables_init (void ) int ret; ret = register_pernet_subsys(&ip_tables_net_ops); ret = xt_register_targets(ipt_builtin_tg, ARRAY_SIZE(ipt_builtin_tg)); ret = xt_register_matches(ipt_builtin_mt, ARRAY_SIZE(ipt_builtin_mt)); ret = nf_register_sockopt(&ipt_sockopts); return ret; } static struct xt_af *xt ;int xt_register_target (struct xt_target *target) u_int8_t af = target->family; list_add(&target->list , &xt[af].target); return 0 ; } int nf_register_sockopt (struct nf_sockopt_ops *reg) struct nf_sockopt_ops *ops ; int ret = 0 ; list_add(®->list , &nf_sockopts); return ret; } module_init(ip_tables_init);
审计完上面部分的代码再回到前面提到的函数compat_nf_sockopt中去,可以得出(1)处后续的执行函数为compat_do_ipt_set_ctl。这里提一嘴,由于该文件ip_tables.c是以内核模块形式存在的,因此我们在调试的时候在内核中需要查看一下该模块是否加载,否则会遇到编写POC时出错无法执行的情况。
继续往后看compat_do_ipt_set_ctl:
1
2
3
4
5
6
7
8
9
10
11
12
13
14
15
16
17
static int compat_do_ipt_set_ctl(struct sock *sk, int cmd, void __user *user, unsigned int len) { int ret; if (!ns_capable(sock_net(sk)->user_ns, CAP_NET_ADMIN)) return -EPERM; switch (cmd) { case IPT_SO_SET_REPLACE: ret = compat_do_replace(sock_net(sk), user, len); break ; } return ret; }
先来看(2)处,因为这个函数是通往漏洞函数的必经之路,因此cmd必须设为IPT_SO_SET_REPLACE,也就是说,编写POC调用int setsockopt(int sockfd, int level, int optname,const void *optval, socklen_t optlen);函数时,optname参数必须设置为IPT_SO_SET_REPLACE。
再看(1)处,此处是比较关键的一个地方。这部分的作用是检测该网络命名空间是否拥有CAP_NET_ADMIN权限,也就是是否拥有ROOT权限。很显然,该漏洞要作为一个提权漏洞是绝对不会拥有ROOT权限的,那么该怎么办?Bypass的办法就是新开辟一个user空间,使得拥有ROOT权限,再在这个基础之上新开辟一个net网络命名空间。在POC中的体现就是(CLONE_NEWUSER是不需要ROOT权限的):
1
2
unshare(CLONE_NEWUSER); unshare(CLONE_NEWNET);
所以这个漏洞也是可以拿来容器逃逸的。
再往后看compat_do_replace函数:
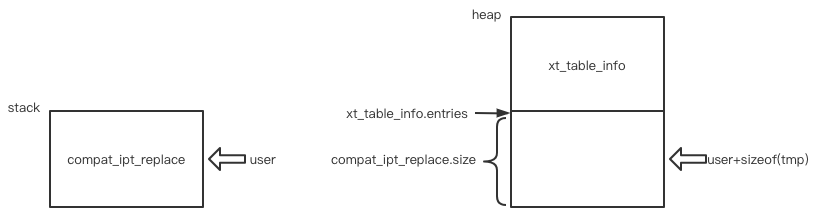
1
2
3
4
5
6
7
8
9
10
11
12
13
14
15
16
17
18
19
20
21
22
23
24
25
26
27
28
29
30
31
32
33
34
35
36
37
38
39
40
41
42
43
44
45
46
47
48
49
50
51
52
53
54
55
56
57
58
59
60
61
62
struct compat_ipt_replace { char name[XT_TABLE_MAXNAMELEN]; u32 valid_hooks; u32 num_entries; u32 size; u32 hook_entry[NF_INET_NUMHOOKS]; u32 underflow[NF_INET_NUMHOOKS]; u32 num_counters; compat_uptr_t counters; struct compat_ipt_entry entries [0]; }; struct xt_table_info { unsigned int size; unsigned int number; unsigned int initial_entries; unsigned int hook_entry[NF_INET_NUMHOOKS]; unsigned int underflow[NF_INET_NUMHOOKS]; unsigned int stacksize; void ***jumpstack; unsigned char entries[0 ] __aligned(8 ); }; static int compat_do_replace(struct net *net, void __user *user, unsigned int len) { int ret; struct compat_ipt_replace tmp ; struct xt_table_info *newinfo ; void *loc_cpu_entry; struct ipt_entry *iter ; if (copy_from_user(&tmp, user, sizeof (tmp)) != 0 ) return -EFAULT; newinfo = xt_alloc_table_info(tmp.size); loc_cpu_entry = newinfo->entries; if (copy_from_user(loc_cpu_entry, user + sizeof (tmp), tmp.size) != 0 ) { } ret = translate_compat_table(net, &newinfo, &loc_cpu_entry, &tmp); return ret; } struct xt_table_info *xt_alloc_table_info (unsigned int size) struct xt_table_info *info = NULL ; size_t sz = sizeof (*info) + size; info = kvmalloc(sz, GFP_KERNEL_ACCOUNT); memset (info, 0 , sizeof (*info)); info->size = size; return info; }
这里就需要用到setsockopt函数里的optval和optlen参数了。首先会填充compat_ipt_replace结构体,其次申请一个xt_table_info结构体堆块(动态size),堆块大小还受传入的compat_ipt_replace.size影响。然后又将用户态剩余的数据填充xt_table_info后半块动态size的区域。用图的形式如下所示:
继续往后看translate_compat_table:
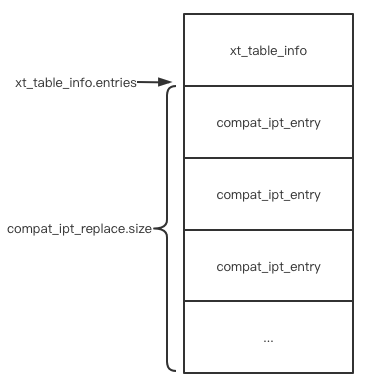
1
2
3
4
5
6
7
8
9
10
11
12
13
14
15
16
17
18
19
20
21
22
23
24
25
26
27
28
29
30
31
32
33
34
35
36
37
38
39
40
41
42
43
44
45
46
47
48
49
struct compat_ipt_entry { struct ipt_ip ip ; compat_uint_t nfcache; __u16 target_offset; __u16 next_offset; compat_uint_t comefrom; struct compat_xt_counters counters ; unsigned char elems[0 ]; }; static int translate_compat_table(struct net *net, struct xt_table_info **pinfo, void **pentry0, const struct compat_ipt_replace *compatr) { unsigned int i, j; struct xt_table_info *newinfo , *info ; void *pos, *entry0, *entry1; struct compat_ipt_entry *iter0 ; struct ipt_replace repl ; unsigned int size; int ret; info = *pinfo; entry0 = *pentry0; size = compatr->size; info->number = compatr->num_entries; xt_entry_foreach(iter0, entry0, compatr->size) { ret = check_compat_entry_size_and_hooks(iter0, info, &size, entry0, entry0 + compatr->size); } ret = -ENOMEM; newinfo = xt_alloc_table_info(size); entry1 = newinfo->entries; pos = entry1; size = compatr->size; xt_entry_foreach(iter0, entry0, compatr->size) compat_copy_entry_from_user(iter0, &pos, &size, newinfo, entry1); return ret; }
(3)中xt_entry_foreach的含义是将entry0区域以compat_ipt_entry结构体形式遍历,即(仅代表单独语句的情景下):
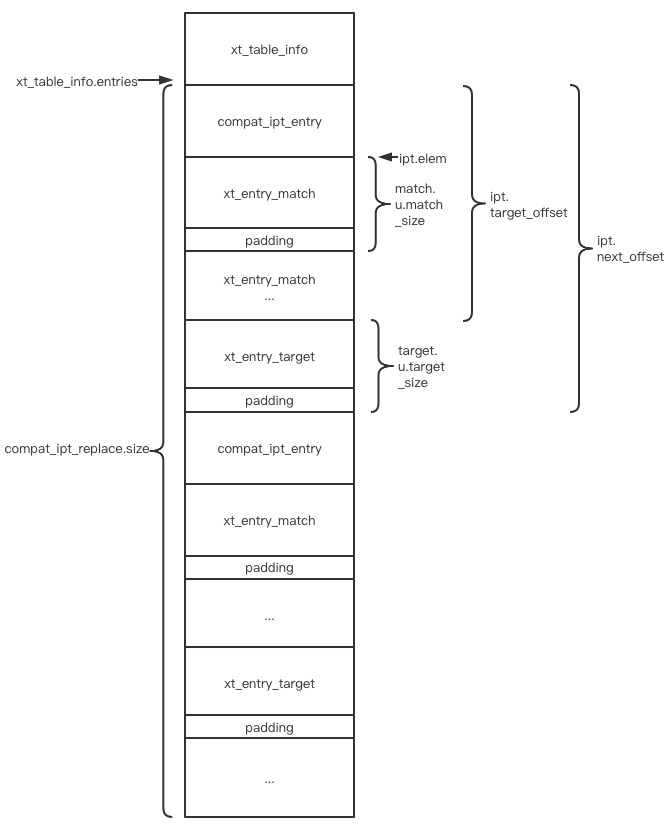
而check_compat_entry_size_and_hooks函数中的信息量就比较大了,需要读者仔细耐心的阅读相关代码。我这里就在阅读完该函数代码的基础下简单用图来说明一下:
该函数的作用就是先校验用户传入的数据结构是否完整和安全(用户传入的数据结构格式如上图),其次将数据结构中的xt_entry_target以及xt_entry_match两个结构体,在全局变量xt(在文章最开始有提到)中的target和match两个链表中的结构体找出相对应的,最终获取相应的xt_target和xt_match变量。获取该变量后会计算offset,该offset就是该函数最重要的一部分,也是后续漏洞成因重要的一部分。举个栗子,假设最终获取了以下这个xt_match:
1
2
3
4
5
6
7
8
9
10
11
12
13
static struct xt_match = { .name = "icmp" , .matchsize = sizeof (struct ipt_icmp), .proto = IPPROTO_ICMP, .family = NFPROTO_IPV4, .me = THIS_MODULE, }; struct ipt_icmp { __u8 type; __u8 code[2 ]; __u8 invflags; };
在check_compat_entry_size_and_hooks函数中有这么一个函数:
1
2
3
4
5
int xt_compat_match_offset (const struct xt_match *match) u_int16_t csize = match->compatsize ? : match->matchsize; return XT_ALIGN(match->matchsize) - COMPAT_XT_ALIGN(csize); }
最终会返回4字节,也就是差4字节对齐,xt_target也一样。
再继续看如下代码:
1
2
3
4
5
6
7
8
9
10
11
12
13
14
15
16
17
static int check_compat_entry_size_and_hooks(struct compat_ipt_entry *e, struct xt_table_info *newinfo, unsigned int *size, const unsigned char *base, const unsigned char *limit) { struct xt_target *target ; int ret, off; off = sizeof (struct ipt_entry) - sizeof (struct compat_ipt_entry); off += xt_compat_target_offset(target); *size += off; return ret; }
代码(6)处可以看到最终这个offset值是会增加在compat_ipt_replace.size上的。
再回到前面看代码(4),增加过后的size会被传入xt_alloc_table_info申请一块新的内存空间。也就是说,在经过check和计算offset之后,会重新申请一块内存空间,用来存放增加了offset之后的数据结构内容。
往后看代码(5)的代码:
1
2
3
4
5
6
7
8
9
10
11
12
13
14
15
16
17
18
19
20
21
22
23
24
25
26
27
28
29
30
31
32
33
34
35
36
37
38
39
40
41
42
43
44
45
static void compat_copy_entry_from_user(struct compat_ipt_entry *e, void **dstptr, unsigned int *size, struct xt_table_info *newinfo, unsigned char *base) { struct xt_entry_target *t ; struct ipt_entry *de ; unsigned int origsize; int h; struct xt_entry_match *ematch ; origsize = *size; de = *dstptr; memcpy (de, e, sizeof (struct ipt_entry)); memcpy (&de->counters, &e->counters, sizeof (e->counters)); *dstptr += sizeof (struct ipt_entry); xt_ematch_foreach(ematch, e) xt_compat_match_from_user(ematch, dstptr, size); de->target_offset = e->target_offset - (origsize - *size); t = compat_ipt_get_target(e); xt_compat_target_from_user(t, dstptr, size); } void xt_compat_target_from_user (struct xt_entry_target *t, void **dstptr, unsigned int *size) const struct xt_target *target = t ->u .kernel .target ; struct compat_xt_entry_target *ct = (struct compat_xt_entry_target *)t ; int pad, off = xt_compat_target_offset(target); u_int16_t tsize = ct->u.user.target_size; char name[sizeof (t->u.user.name)]; t = *dstptr; memcpy (t, ct, sizeof (*ct)); if (target->compat_from_user) target->compat_from_user(t->data, ct->data); else memcpy (t->data, ct->data, tsize - sizeof (*ct)); pad = XT_ALIGN(target->targetsize) - target->targetsize; if (pad > 0 ) memset (t->data + target->targetsize, 0 , pad); }
假设前面所得的xt_match和xt_target分别为:
1
2
3
4
5
6
7
8
9
static struct xt_match = { .name = "icmp" , .matchsize = sizeof (struct ipt_icmp), }; static struct xt_target = { .name = "NFQUEUE" , .targetsize = 6 , };
(7)处*size的值会因为xt_match计算出的offset增加4字节,因此最终de->target_offset的结果会变为4 。相当于在原先堆块的基础上补上了缺少的这一小部分字节。此时的xt_target->targetsize为6,那么前期(6)处计算出的off总数就是4(包括xt_match和xt_target,xt_target的为0,也就是说后续需要补上4个字节的空间,前面(7)处的xt_match已经补上4字节了)。(8)处错误的计算(计算结果为8-6=2 ),导致(9)就变为了memset(t->data+6, 0, 2);,t->data之外的空间并没有拓展(因为前面计算xt_target的offset时候为0,不需要补字节),因此就导致溢出 了八字节,但是溢出能够写的个数只有两字节。以下示意图为增加offset剩余对齐部分的前后过程。
这时候再回过头看文章开头(或(9)处)的漏洞代码,就能够明白为什么会溢出了,当然实际上xt_target的值也不止为6(xt_match同理),相应的溢出字节数也会不一样,需要根据实际情况来对应。
这里需要注意的是内核中的内存申请和用户态的malloc是不一样的。本例中这块xt_table_info相关的内存空间是由kvmalloc申请的,最终调用的应该是kmalloc,我查了一下申请的size的规律 :
kmalloc() will return a memory chunk with size of power of 2 that matches or exceeds len and will return NULL upon failure. The maximum size allocatable by kmalloc() is 1024 pages, or 4MB on x86. Generally for requests larger than 64kB, one should use __get_free_page() functions to ensure inter-platform compatibility.
也就是说申请的size大小按照2的幂次来计算。
那么为了方便后续的漏洞利用,这里我就将xt_table_info这块结构体构造成0x1000大小,使得溢出的字节刚好能够覆盖到下一个申请的结构体上去。
最终构造的堆块情况如下图所示:
以上就完成了PoC部分的构造了。
0x04 Exploit