QEMU源码分析 - 节点树结构
前面分析QTest的时候就已经分析过了协议中的几个node节点,有machine、drive、interface等等。在QEMU源码当中,对于主板、外接设备、内存等的虚拟化,也使用了节点树的结构来编写。节点与节点之间存在着关系/三属性,有child、link等等的节点间关系,例如child就表示两者之间存在父子属性。
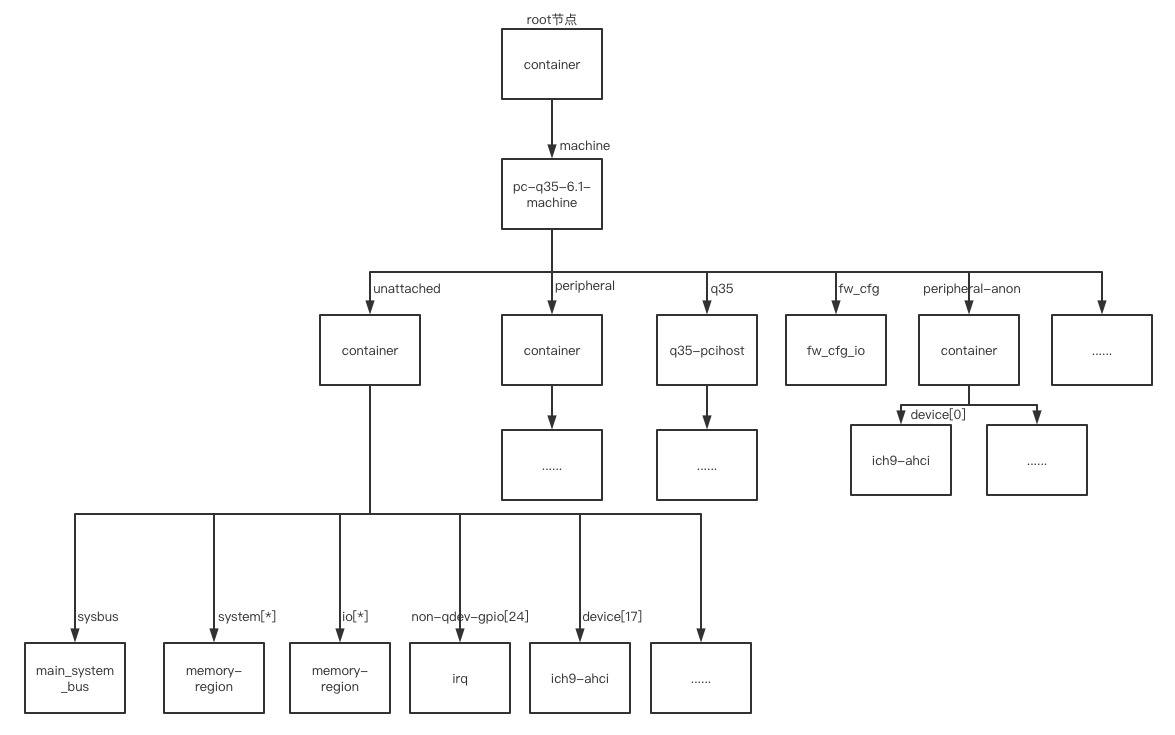
先直接上结论,以x86架构为基础,QEMU模拟x86架构的整个节点树如下所示(基于Q35的主板),我这里就按照节点对象的child属性来举例,如果没有child属性则不例举出来了。
举个栗子:
假设目前使用的是pc-q35-6.1的主板,那么整一条链就如下所示:
1
| Object -> machine -> x86-machine -> generic-pc-machine -> pc-q35-6.1-machine
|
也就是说pc-q35-6.1-machine是前面几个一层一层继承下来的。但是这仅限于TypeImpl和TypeInfo层面,在Object层面并不一定存在父子parent关系,Object层面的父子关系会在Object->properties中的child属性体现。但是他们没有child属性,因此我就忽略了。用代码来说就是Object->properties中没有child属性:
1
2
3
4
5
6
7
8
9
| struct Object
{
ObjectClass *class;
ObjectFree *free;
GHashTable *properties;
uint32_t ref;
Object *parent;
};
|
节点树如下:

从QEMU入口函数开始看:
1
2
3
4
5
6
| void qemu_init(int argc, char **argv, char **envp)
{
qemu_create_machine(select_machine());
}
|
往下:
1
2
3
4
5
6
7
8
9
10
11
12
13
14
15
16
17
18
19
20
21
22
23
24
25
26
27
28
29
| static void qemu_create_machine(MachineClass *machine_class)
{
current_machine = MACHINE(object_new_with_class(OBJECT_CLASS(machine_class)));
if (machine_help_func(qemu_get_machine_opts(), current_machine)) {
exit(0);
}
object_property_add_child(object_get_root(), "machine",
OBJECT(current_machine));
object_property_add_child(container_get(OBJECT(current_machine),
"/unattached"),
"sysbus", OBJECT(sysbus_get_default()));
cpu_exec_init_all();
}
Object *object_get_root(void)
{
static Object *root;
if (!root) {
root = object_new("container");
}
return root;
}
|
qemu_create_machine()函数中第一次创建root节点container,并将主板Object设置为child属性,属性名为machine。从节点树的图中可以看到可视化的关系。再往下看cpu_exec_init_all():
1
2
3
4
5
6
7
8
9
10
11
12
13
14
15
16
17
18
19
20
21
22
23
24
25
26
27
28
29
30
31
32
33
34
35
36
37
38
39
40
41
42
43
44
45
| void cpu_exec_init_all(void)
{
memory_map_init();
}
static void memory_map_init(void)
{
system_memory = g_malloc(sizeof(*system_memory));
memory_region_init(system_memory, NULL, "system", UINT64_MAX);
address_space_init(&address_space_memory, system_memory, "memory");
system_io = g_malloc(sizeof(*system_io));
memory_region_init_io(system_io, NULL, &unassigned_io_ops, NULL, "io",
65536);
address_space_init(&address_space_io, system_io, "I/O");
}
void memory_region_init(MemoryRegion *mr,
Object *owner,
const char *name,
uint64_t size)
{
object_initialize(mr, sizeof(*mr), TYPE_MEMORY_REGION);
memory_region_do_init(mr, owner, name, size);
}
static void memory_region_do_init(MemoryRegion *mr,
Object *owner,
const char *name,
uint64_t size)
{
if (name) {
char *escaped_name = memory_region_escape_name(name);
char *name_array = g_strdup_printf("%s[*]", escaped_name);
if (!owner) {
owner = container_get(qdev_get_machine(), "/unattached");
}
object_property_add_child(owner, name_array, OBJECT(mr));
}
}
|
memory_map_init()该函数是申请guest空间的总MemoryRegion的关键函数,外接设备申请的MemoryRegion就是在这空间内分配的,可以看见io空间的size为0x10000。后续就有将MemoryRegion设为child属性的部分了,先来看比较关键的container_get()函数。
1
2
3
4
5
6
7
8
9
10
11
12
13
14
15
16
17
18
19
20
21
22
23
24
25
26
27
28
29
30
31
32
33
34
35
36
37
38
39
40
41
42
43
44
45
46
47
48
49
50
51
52
| Object *container_get(Object *root, const char *path)
{
Object *obj, *child;
char **parts;
int i;
parts = g_strsplit(path, "/", 0);
assert(parts != NULL && parts[0] != NULL && !parts[0][0]);
obj = root;
for (i = 1; parts[i] != NULL; i++, obj = child) {
child = object_resolve_path_component(obj, parts[i]);
if (!child) {
child = object_new("container");
object_property_add_child(obj, parts[i], child);
object_unref(child);
}
}
g_strfreev(parts);
return obj;
}
Object *object_resolve_path_component(Object *parent, const char *part)
{
ObjectProperty *prop = object_property_find(parent, part);
if (prop == NULL) {
return NULL;
}
if (prop->resolve) {
return prop->resolve(parent, prop->opaque, part);
} else {
return NULL;
}
}
ObjectProperty *object_property_find(Object *obj, const char *name)
{
ObjectProperty *prop;
ObjectClass *klass = object_get_class(obj);
prop = object_class_property_find(klass, name);
if (prop) {
return prop;
}
return g_hash_table_lookup(obj->properties, name);
}
|
总的来说container_get()就是获取名为传入参数argv[1]的属性中的子对象。以object_property_add_child(Object obj, **const char name, Object *child**)为例来说就是匹配name名为parts的属性,返回属性中的child Object。
再往回看就是owner = container_get(qdev_get_machine(), "/unattached");这一语句,就是以pc-q35-6.1-machine节点对象为基础,在此基础上寻找名为unattached的属性名,没有则申请一个container Object节点并与pc-q35-6.1-machine节点创建名为unattached的properties。在图中也很容易看到相关的属性对应关系。
而在qemu_create_machine()最开始部分MACHINE(object_new_with_class(OBJECT_CLASS(machine_class))),这里最终会调用hw/core/machine.c:machine_initfn()函数:
1
2
3
4
5
6
7
8
| static void machine_initfn(Object *obj)
{
MachineState *ms = MACHINE(obj);
MachineClass *mc = MACHINE_GET_CLASS(obj);
container_get(obj, "/peripheral");
container_get(obj, "/peripheral-anon");
}
|
相应的也会创建两个container对象节点,properties属性分别名为peripheral、peripheral-anon。在图中也能找到相关的对应关系。
这里我有个猜测,三个container节点unattached、peripheral、peripheral-anon,分别代表着未附加设备、附加的外部设备、附加的匿名外部设备(仅供参考)。
其中未附加设备的节点添加关键部分在这里:
1
2
3
4
5
6
7
8
9
10
11
12
13
14
15
16
17
18
19
| static void device_set_realized(Object *obj, bool value, Error **errp)
{
if (value && !dev->realized) {
if (!check_only_migratable(obj, errp)) {
goto fail;
}
if (!obj->parent) {
gchar *name = g_strdup_printf("device[%d]", unattached_count++);
object_property_add_child(container_get(qdev_get_machine(),
"/unattached"),
name, obj);
unattached_parent = true;
g_free(name);
}
}
}
|
以ich9-ahci举例,调用链如下:
1
| pc_q35_init->pci_create_simple_multifunction->pci_realize_and_unref->qdev_realize_and_unref->qdev_realize->object_property_set_bool->object_property_set->object_property_set_qobject->property_set_bool->device_set_realized->object_property_add_child->object_property_try_add_child->object_property_try_add
|
此时的name和type为:
1
2
3
4
| pwndbg> p type
$333 = 0x603000079060 "child<ich9-ahci>"
pwndbg> p name
$334 = 0x60200004d310 "device[17]"
|
附加的外部设备节点添加关键部分在这里:
1
2
3
4
5
6
7
8
9
10
11
12
13
14
15
16
17
18
19
20
21
22
23
24
25
26
27
28
29
| DeviceState *qdev_device_add(QemuOpts *opts, Error **errp)
{
BusState *bus = NULL;
driver = qemu_opt_get(opts, "driver");
dev = qdev_new(driver);
qdev_set_id(dev, qemu_opts_id(opts));
}
void qdev_set_id(DeviceState *dev, const char *id)
{
if (id) {
dev->id = id;
}
if (dev->id) {
object_property_add_child(qdev_get_peripheral(), dev->id,
OBJECT(dev));
} else {
static int anon_count;
gchar *name = g_strdup_printf("device[%d]", anon_count++);
object_property_add_child(qdev_get_peripheral_anon(), name,
OBJECT(dev));
g_free(name);
}
}
|
还是拿ich9-ahci举例,此时的name和type为:
1
2
3
4
| pwndbg> p type
$335 = 0x60300007fc90 "child<ich9-ahci>"
pwndbg> p name
$336 = 0x60200005a730 "device[0]"
|
以上节点树的结构,我认为对于fuzz来说,最好用的部分在哪里呢,就是对于每个device的memory region的查找。每个设备都有着自己的memory region,而memory region根据前面的分析来说是会在设备Object下创建相应的child properties的。
因此,在fuzz过程当中,我们主要做的工作就是对设备的memory region进行读写操作。所以我们可以根据设备Object的properties来很快速的查找所有在该设备下的memory region,从而后续对其进行相应的fuzz操作。
QEMU中遍历Object的properties代码为:
1
2
3
4
5
6
7
8
9
10
11
12
13
14
15
16
17
18
19
20
21
22
23
24
25
26
27
| static int do_object_child_foreach(Object *obj,
int (*fn)(Object *child, void *opaque),
void *opaque, bool recurse)
{
GHashTableIter iter;
ObjectProperty *prop;
int ret = 0;
g_hash_table_iter_init(&iter, obj->properties);
while (g_hash_table_iter_next(&iter, NULL, (gpointer *)&prop)) {
if (object_property_is_child(prop)) {
Object *child = prop->opaque;
ret = fn(child, opaque);
if (ret != 0) {
break;
}
if (recurse) {
ret = do_object_child_foreach(child, fn, opaque, true);
if (ret != 0) {
break;
}
}
}
}
return ret;
}
|
可以编写相应的回调函数来查找相应的memory region。

